Harley-Davidson Offers Low Cost Motorcycle Training

Harley-Davidson Offers Low Cost Motorcycle Training

Harley-Davidson has been on a big mission lately to teach as many people as possible to love motorcycling. Besides their efforts to teach a whole city to ride, Harley has been reaching out to those with a military affiliation also.

As part of that initiative, Harley-Davidson had announced free Riding Academy motorcycle training to any current and former U.S. military members for the year of 2016. To continue its salute to the military, Harley-Davidson extended the program from March 15th to November 30th of 2017. Unfortunately (you know there’s always a catch to these things), some changes were made for the 2017 calendar year.

First, the offer is now available to active-duty, retired, reservists, veterans, and their spouses. Bad news (which really isn’t so bad) is that the class is now $99. Yes, it’s not free anymore but compared to what some states cost (cough, cough, New York, Arizona, Indiana, cough, cough, $250+), you are definitely getting a good deal.

Find out more about the program at:

https://ridefree.harley-davidson.com/americanheroes

Start Your Motorcycle Using FINE-C

Start Your Motorcycle Using FINE-C

Over the years, I’ve been blessed enough to introduce several friends and family to the world of motorcycling and teaching them how to ride. One thing that I see in common, with almost all new riders, is remembering the starting and cut off process. Lucky for them, the Motorcycle Safety Foundation’s (MSF) FINE-C mnemonic can make it easy to remember.

Use the mnemonic FINE-C when starting your bike up. On the flip side, you can use C-ENIF whenever you need to shut down your vehicle. Over time, as you get more comfortable with your bike, you will remember the steps and it will become second nature to you.

F – stands for FUEL. Some bikes have what’s called a Reserve switch. Make sure that you’re in the regular On position. Due to differences in every bike, I would suggest you review your owner’s manual to learn the specifics for your brand and model.   Some motorcycle have an automatic fuel switch. However, even for those particular models, you must still make sure that you are not in reserve.

I – stands for IGNITION. Turn your key or key fob on your main ignition switch to the On position.

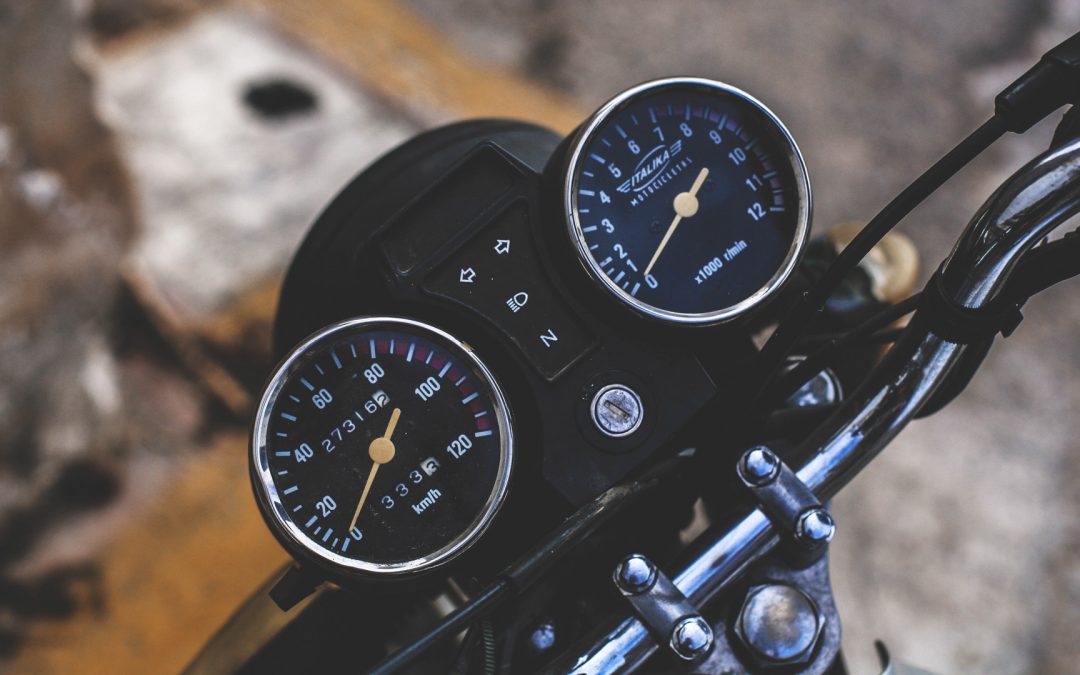
N – stands for NEUTRAL. Ensure your transmission is in neutral. Use the indicator light, usually on your dashboard, to make sure that your motorcycle’s transmission is in neutral. In addition, when the light is saying you’re in neutral, slightly roll the bike forward a couple of inches. While this is great for verifying that you are in neutral, this also allows you to check that your Neutral Indicator Light is working as expected..

E – stands for ENGINE. Place your Engine Kill Switch into the On position.

C – stands for CHOKE / CLUTCH. Motorcyclists often use the C as a reminder to pull the clutch in before starting a bike. In addition, the C also stands for setting the appropriate choke settings depending on engine temperature. Once again, I defer to your owner’s manual for the specifics of when you should or should not use the choke.

Shutting your bike down for the night is just as simple. You simply reverse the letters (and settings) to shut down your bike.

C – stands for CHOKE / CLUTCH. If your Choke is still on (which it shouldn’t be since your engine is warm), turn the setting to Off. Remember to keep your Clutch fully engaged however since your are still in gear with the engine still on at this point.

E – stands for ENGINE. Flip the Kill Switch to stop the engine. Needless to say, this also tests the functionality of the switch at the same time.

N – stands for NEUTRAL. Put the bike in Neutral. Slightly roll the bike to make sure you’re in the correct gear. If you’re parked on an incline, it is usual okay to leave your bike in gear to prevent it from rolling.

I – stands for IGNITION. Turn your ignition completely off. Make sure you don’t accidently place it in Parking (which will leave your taillights on) guaranteeing a dead battery by the morning.

F – stands for FUEL. Make sure that your Reserve switch is set to use your regular gas supply and not the reserve supply. Check you owner’s manual for the specifics of your brand / model. If your motorcycle has an automatic fuel switch, you’re in luck… just make sure that you are not in reserve mode and you’re good to go.

T-CLOCS Isn’t a Rapper… It’s Part of Motorcycle Safety

T-CLOCS Isn’t a Rapper… It’s Part of Motorcycle Safety

Increase the chances of making every ride a safe ride by incorporating the Motorcycle Safety Foundation’s (MSF) T-CLOCS inspection into every ride. This simple check of a few key components can easily be completed in less than 5 minutes. By doing this every ride, you help ensure the safe operation of your motorcycle plus you can spot minor issues before they become major problems. The T-CLOCS inspection process is attributed to the M.S.F. or Motorcycle Safety Foundation and it stands for Tires, Controls, Lights, Oil, Chassis, and Stands. In addition, most owner’s manuals include a brand / model-specific version of a T-CLOCS inspection. I would highly suggest reading there first to pick up brand/model specific tips.

T – stands for TIRES

Check and make sure that front and rear tires are both inflated to the proper pressures for the situation i.e. carrying a passenger and/or luggage. While checking air pressure,  you also want to measure the tread thickness. Examine the tread surface for any cuts, embedded debris, and other defects. Also, check the sidewalls for unusual cracks or bulges in the rubber. From here you can progress to the rims themselves.For rims that are cast, inspect closely for any cracks or dents. If you have spoked rims, randomly test several of them to check for proper tension. If correctly adjusted, no spokes should be able to move by hand. Grab the whole wheel and try to move it from side to side. Any movement here can indicate a failure in your wheel bearings. Check your front and rear brakes to make sure that everything seems normal and operational. To be able to check pressure and thickness with one tool, I would highly recommend Accutire’s MS-48B Digital Combination Tire Thread Depth Gauge and Tire Pressure Gauge.

C – stands for CONTROLS

The next step is checking your hand and foot controls. You want to make sure that any levers and pedals are undamaged, properly adjusted, and aren’t binding on anything. Check your throttle and clutch cables for smooth operation with no binding. Ensure that there is no wire fraying at any points along the cable. Check brake, ABS, clutch, and any of hydraulic hoses for bulges, leaks, or signs of breaking down and/or deterioration. Open and close your throttle to ensure crisp movement, with no binding, and that it immediately snaps back to a neutral position when released.

L – stands for LIGHTS

Make sure all your lights and electrical components are working. Check your headlamps (both low and high beams), tail and brake lights, as well as your front and rear turn signals. Don’t forget to make sure that your battery is fully charged. My battery (YTX12-BS Sealed iGel Motorcycle Battery) has a battery gauge on top which makes checking the power an easy process.

O – stands for OIL

Your bike’s fluids such as oil and other fluids are usually very easy to check with a quick visual inspection in most cases.. Hydraulic reservoirs for your clutch and/or brakes come with a sight glass opening or they’re made of translucent plastic, which makes the check for fluid levels an easy thing to do. For bikes that are liquid cooled versus air cooled, the overflow tank is made of translucent plastic, so you should be able to easily verify the correct levels with a glance.ant. Glass portholes are also common on the side of oil reservoirs so checking your oil level should be just as simple as the other fluids.

C – stands for CHASSIS

Now take a few moments to inspect the chassis. Rotate the handlebar(s) through their movement fully. They should move freely, with no sticking, and no feel of flat spots in the steering head bearings. With the bike on its center stand or work stand, grasp the fork legs near the axle and try to move them front-to-back. Any play indicates a problem. At the rear, grab the wheel and try to move it side-to-side. Again, any movement indicates a problem, in this case with the swingarm bearings. Check chain tension, lubrication, and alignment, then inspect the rear sprocket teeth for unusual wear. Take the bike off its stand, sit in the saddle and make sure both front and rear suspensions move freely and smoothly.

S- stands for STANDS

Inspect your side stand and/or center stand (if applicable). It should snap crisply back into place with no binding issues. Make sure you check for any cracks or bends that would signal an immediate need for repair. Also check that the stand springs are in good condition and that the unit, as a whole, will safely and securely support your motorcycle.

Read more at the Motorcycle Safety Foundation’s website.